Friday, July 25, 2014

Cake Batter Smoothie (Sorta healthy)


We've been on a smoothie kick lately, and this is something I just REALLY wanted but not to be healthy-ish.

1 Cup Milk (of your choice)
1 Frozen banana (peeled before freezing)
3 TBSP Vanilla Cake Mix
1 Tsp Vanilla Extract
Sprinkles (Festive, but optional)

Place ingredients in blender and blend until smooth.

OH YUM.

Sunday, June 15, 2014

Chocolate Banana Oatmeal Smoothie

1 Cup Almond Milk
1 Banana, peeled and frozen
1 TBSP Dark Chocolate Cocoa Powder (or regular if that's what you have)
1 to 2 TBSP Oats
1 packet sweetener or sugar (optional)

Break up banana and place in blender with other ingredients. Blend until smooth.
Makes 1 Smoothie.

184 Calories, 4 grams Fat, 3 grams protein

Saturday, August 1, 2009

Dark Chocolate Mint Ice Cream


I've deemed this the summer of ice cream. I've had my small Panasonic ice cream maker for years after getting it on sale at Amazon for $15. This is the first year I've really used it though, and definitely the first time I've made ice cream in it.

As I said before, Dave's favorite is mint chocolate chip, so when I wanted to make another batch of ice cream, I decided to flip the combination and make a dark chocolate ice cream with mint flavoring. This was the best batch yet!

I usually prefer a non-custard base ice cream, but for some reason this combination worked. It only includes three egg yolks and it was just enough to make it nice and creamy without adding any elasticity that you see at Cold Stone or such.

INGREDIENTS

1 cups half-and-half
2/3 cup sugar
1/3 cup unsweetened dark chocolate cocoa
3 large egg yolks
1 cups heavy cream
1/4 teaspoon peppermint extract

DIRECTIONS

  1. Heat half-and-half and sugar over low heat just until sugar dissolves. Add dark chocolate cocoa and stir until incorporated.

  2. In a separate bowl, beat egg yolks and heavy cream until yolks are pale yellow and slightly thick.

  3. Temper the egg yolks by slowly drizzling in 1/4 cups of hot half-and-half mixture, whisking constantly. Pour the egg yolks into hot half-and-half and cook over low to medium-low heat until it thickens. Add 1/4 teaspoon peppermint extract.
    Chill mixture completely, then freeze in an ice cream maker following the manufacturer’s directions. For best results, transfer to a lidded container and freeze overnight.

Tuesday, July 21, 2009

Andes Mint Chocolate Chip Ice Cream


Apparently we've been on an ice cream kick lately. Dave's favorite ice cream ever is Mint Chocolate Chip and his favorite candy is Andes mints, so the combination was obvious. One of my favorite boards posted this recipe and I just subbed Andes mints for Junior Mints.

Homemade Chocolate Mint Ice Cream

1 1/2 cup whole milk
1/2 cup sugar
pinch of salt
1/3 cup heavy cream
2/3 cup half and half
1/4 teaspoon peppermint extract
1 small box Junior mints, diced or halved 1/2 box Andes mints, diced
4 drops green food coloring, optional

Mix milk, salt and sugar with a wire whip until sugar dissolves. Add remaining ingredients and stir. Freeze in 1 1/2 quart ice cream freezer according to manufacturer's instructions.

Saturday, July 18, 2009

Vanilla Bean Ice Cream


Since I now have an abundance of vanilla beans from a great Amazon deal, the first thing I wanted to do after making Vanilla Extract was make ice cream. Vanilla Bean is and always will be my favorite flavor. Nothing beats feeling those seeds between your teeth and the crunch they make when you bite them just right.

For this recipe I went to my hero, Alton Brown.

This makes the perfect amount of ice cream for my small Panasonic ice cream maker at 3 cups of liquid.

INGREDIENTS

2 cups half-and-half
1 cup whipping cream
1 cup minus 2 tablespoons sugar
2 tablespoons peach preserves (not jelly) I didn't use this
1 vanilla bean, split and scraped

DIRECTIONS

Combine all ingredients (including the bean and its pulp) in a large saucepan and place over medium heat. Attach a frying or candy thermometer to inside of pan. (see note below) Stirring occasionally, bring the mixture to 170 degrees F. Remove from heat and allow to cool slightly. Remove the hull of the vanilla bean, pour mixture into lidded container and refrigerate mixture overnight to mellow flavors and texture.

Freeze mixture in ice cream freezer according to unit's instructions. The mixture will not freeze hard in the machine. Once the volume has increased by 1/2 to 3/4 times, and reached a soft serve consistency, spoon the mixture back into a lidded container and harden in the freezer at least 1 hour before serving.

NOTE: If you do not have a thermometer, bring the mixture just barely to a simmer. As soon as you see a bubble hit the surface, remove it from the heat. Do not let it boil.

Monday, June 29, 2009

Squash Souffle


If you've been to Panera for breakfast lately, you know they're now serving delicious souffles. It's not a textbook souffle, but it was all I needed for inspiration.

I decided to use some fresh squash that Cilla gave me and this was the result.


I started by sauteing thinly sliced squash and small-diced onion.


Cook it low and slow for about 10 or 15 minutes until soft.

Next, I made the egg mixture.

Three eggs, salt, pepper, dijon mustard, and cheese. Lots of cheese. I put at least two big handfuls.

Panera uses cute paper cups for their souffles, but I happen to have some neat aluminum ramekins from my granny. I love this one lonely yellow one.


For the crust, I used refrigerated croissant rolls. When you unroll them they are attached as triangles that make a rectangle, so just pinch the seams together and roll out into a square.


Or...sometimes not so square.

I just folded it over and rolled it out again.

I then laid the squares (or squiggles as they may be) into my ramekin and let the edges hang over.


Then I ladled the egg mixture into the ramekins and folded the edges up like a present.


I didn't take a picture, but I did brush on some of the left over egg mixture from my mixing bowl onto the croissant before baking for 20 to 25 minutes.

Ta da!

Squash Souffle!


Recipe:
1 1/2 cups yellow squash, seeded and sliced thin
1/2 cup chopped onion
3 eggs -- beaten
2 teaspoons flour
1/8 teaspoon salt
1/8 teaspoon pepper
1 tablespoon dijon
1/4 cup milk
2 tablespoons margarine
1 1/2 cups cheese -- grated
1 roll refrigerated croissants

Cook squash and onion together until tender in butter and set aside to cool. Beat eggs and add flour, cheese, salt, pepper, mustard and milk. Roll out Croissant rectangles into rough squares. Line round ramekins with croissant squares leaving the ends hanging over edges. Add squash and onion into egg mixture and pour into ramekins. Bake in a 350 degree oven for 25 minutes. Makes 4 servings.

Sunday, February 22, 2009

Challah

This year at Thanksgiving, I took over the bread making. First of all, I'm not a bread maker. I usually only like recipes that take less than 30 minutes, and I usually don't like to have to measure things perfectly; however, it's Dave's family's tradition to have Challah bread at Thanksgiving, and I love a challenge. As you can see by the picture (or at least I hope you think so too!), the bread came out SO impressive with minimal work. That's my kind of recipe.

INGREDIENTS
2 1/2 cups warm water (110 degrees F/45 degrees C)
1 tablespoon active dry yeast
1/2 cup honey
4 tablespoons vegetable oil
3 eggs
1 tablespoon salt
8 cups unbleached all-purpose flour
1 tablespoon poppy seeds (optional)

DIRECTIONS
  1. In a large bowl, sprinkle yeast over barely warm water. Beat in honey, oil, 2 eggs, and salt. Add the flour one cup at a time, beating after each addition, graduating to kneading with hands as dough thickens. Knead until smooth and elastic and no longer sticky, adding flour as needed. Cover with a damp clean cloth and let rise for 1 1/2 hours or until dough has doubled in bulk.

  2. Punch down the risen dough and turn out onto floured board. Divide in half and knead each half for five minutes or so, adding flour as needed to keep from getting sticky. Divide each half into thirds and roll into long snake about 1 1/2 inches in diameter. Pinch the ends of the three snakes together firmly and braid from middle. Either leave as braid or form into a round braided loaf by bringing ends together, curving braid into a circle, pinch ends together. Grease two baking trays and place finished braid or round on each. Cover with towel and let rise about one hour.

  3. Preheat oven to 375 degrees F (190 degrees C).

  4. Beat the remaining egg and brush a generous amount over each braid. Sprinkle with poppy seeds if desired.

  5. Bake at 375 degrees F (190 degrees C) for about 40 minutes. Bread should have a nice hollow sound when thumped on the bottom. Cool on a rack for at least one hour before slicing.

Saturday, February 7, 2009

Homemade Apple Pie

Dave has been asking for months for me to make him an apple pie, and for various reasons I just never did it. Today, I decided I'd make him that pie since we're having company. I mean, come on. What's more impressive to company than a homemade pie?

INGREDIENTS
1 recipe pastry for a 9 inch double crust pie (Recipe included below)
1/2 cup unsalted butter
3 tablespoons all-purpose flour
1/4 cup water
1/2 cup white sugar
1/2 cup packed brown sugar
1 tsp vanilla extract
Dash of cinnamon
8 Granny Smith apples - peeled, cored and sliced (I used 5 large apples)

DIRECTIONS
  1. Preheat oven to 425 degrees F (220 degrees C). Melt the butter in a saucepan. Stir in flour to form a paste. Add water, white sugar and brown sugar, and bring to a boil. Reduce temperature and let simmer for 5 minutes.

  2. Place the bottom crust in your pie plate. Toss apples with sugar and butter liquid and place in pie plate, mounded slightly. Cover with a lattice work of crust or one full crust. Brush crust with egg wash or melted butter.

  3. Bake 15 minutes in the preheated oven. Reduce the temperature to 350 degrees F (175 degrees C). Continue baking for 35 to 45 minutes, until apples are soft.

Pie Crust

INGREDIENTS
1/4 cup shortening
1/4 cup butter
1 1/2 cups all-purpose flour
1/2 teaspoon salt
1/2 cup cold water

DIRECTIONS
  1. Mix shortening, flour, and salt together with a fork or a pastry blender until very crumbly. Add as much water as needed to hold together, and mix lightly with a fork. To double this recipe, use 1 cup shortening, 2 1/2 cups flour, 1 teaspoon salt, and 1 cup cold water.

  2. Kneed only to combine, one crust at a time, on a floured pastry cloth, to about an inch larger than pie plate. Fold carefully in half. Lift to pie plate, and unfold. Fit into pan. For a single-crust pie, trim with a small knife to about 1/2 inch beyond rim. Fold up, and pinch so edge of pie is raised from rim. For a two-crust pie, trim bottom crust to edge of rim, fill, and top with crust about 1/2 inch larger than rim. Tuck top crust under bottom along rim. Seal with floured fork.

Monday, February 2, 2009

Sloppy Joes, Sloppy, Sloppy Joes

Holy Crap She Updated!

I have been craving sloppy joes (shut up) forever and four days now. Even though Dave emailed to say he'd be home late tonight, I decided I was making sloppy joes for myself anyway.

I always used to think sloppy joes came from a can, but did you know you can MAKE them yourself, and please do. These were really delicious. I had two. I think I might just go get more joes without the bread...

INGREDIENTS
1 pound lean ground beef
1/4 cup chopped onion
1/4 cup chopped green bell pepper
1/2 teaspoon garlic powder
1 teaspoon prepared yellow mustard
3/4 cup ketchup
3 teaspoons brown sugar
salt to taste
ground black pepper to taste

DIRECTIONS
  1. In a medium skillet over medium heat, brown the ground beef, onion, and green pepper; drain off liquids.

  2. Stir in the garlic powder, mustard, ketchup, and brown sugar; mix thoroughly. Reduce heat, and simmer for 30 minutes. Season with salt and pepper.

Thursday, August 14, 2008

Lopsided Lego Cake

Don't be like me kids. I decided exactly 3 days before Dave's birthday that I would make him a lego cake. Unfortunately, something came up the Thursday before his birthday, so I didn't get to make it and take my time like I wanted. Regardless, he loved his legos and I got 800 cool wife points.

Normally I would have made the cake from scratch as well as the frosting, but that whole time crunch thing had me using a boxed cake and frosting in a can. Truth be told, I was embarrassed, but no one knew since I always make cakes from scratch. TA DA! My comments are in italics.

INGREDIENTS

1 box Betty Crocker® SuperMoist® cake mix (any flavor)
Water, vegetable oil and eggs called for on cake mix box
Tray or cardboard, 15x12 inches, covered (I ended up getting smart and using my large cutting board.)
2 containers (1 lb each) Betty Crocker® Rich & Creamy vanilla frosting
Red, yellow and blue paste food colors
12 large marshmallows, cut in half crosswise (Use kitchen scissors to cut them.)

DIRECTIONS
  1. Heat oven to 350°F (325°F for dark or nonstick pan.) Grease bottom and sides of 13x9-inch pan with shortening and lightly flour, or spray with baking spray with flour. Make cake mix as directed on box, using water, oil and eggs. Pour into pan.

  2. Bake as directed on box for 13x9-inch pan. Cool 10 minutes; remove from pan to cooling rack. Cool completely, about 1 hour.

  3. Using serrated knife, cut cake crosswise into thirds. Cut one of the thirds in half crosswise to make 2 squares. On tray, place cake pieces. Cover; freeze 1 hour or until firm.

  4. In small bowl for each color, tint 1 cup frosting red, 1 cup frosting yellow and 2/3 cup frosting blue with food colors. Leave remaining frosting white.

  5. Frost top and sides of 1 square cake with blue frosting. Frost 4 marshmallow halves with blue frosting; place in square design on cake. Frost remaining square cake and 4 marshmallow halves with white frosting; arrange marshmallows on top of cake. Frost 1 rectangular section of cake and 8 marshmallow halves with yellow frosting; arrange marshmallows on top of cake. Frost remaining section of cake and remaining marshmallows with red frosting; arrange marshmallows on top of cake. Store loosely covered at room temperature.

Recipe from Betty Crocker.

Wednesday, July 9, 2008

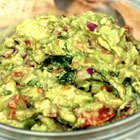
Guacamole

I don't think I've mentioned this yet, but anytime I use a photo that's not my own, you can click on it and it will take you directly to the photographer's site. In this case, that's the recipe on www.allrecipes.com because this photo was taken by them for this particular recipe. Moving on, I made this for the 4th of July just like everything else I've posted this week. Even my husband who hates guacamole loved this. It's a really easy recipe, and was no problem for me even though I've never made guac before. Actually, I'd never made anything I made for the 4th before. I'm a daredevil like that.

TIPS

  • If you're an avocado virgin like me, I think it's best to buy under-ripe avocados and ripen them in a paper bag yourself than trying to figure out just what a ripe avocado feels like.

    The unripened avocados are a bright green. Just buy them a day or two before you need them and put them in a brown paper bag. When they are dark all over and give into the pressure of your finger when you squeeze it, they're ripe.


  • INGREDIENTS

    3 avocados - peeled, pitted, and mashed
    1 lime, juiced
    1 teaspoon salt
    1/2 cup diced onion
    3 tablespoons chopped fresh cilantro
    2 roma (plum) tomatoes, diced
    1 teaspoon minced garlic
    1 pinch ground cayenne pepper (optional)

    DIRECTIONS
    1. 1. In a medium bowl, mash together the avocados, lime juice, and salt. Mix in onion, cilantro, tomatoes, and garlic. Stir in cayenne pepper. Refrigerate 1 hour for best flavor, or serve immediately.

    Tuesday, July 8, 2008

    Brownie and Peanut Butter Ice Cream Sandwiches

    I'm not going to lie. These were a pain in the butt to make. Actually, that's probably an understatement. So many things went wrong, but I looked into my inner Bob Ross to realize mistakes are just Happy Little Accidents and an opportunity to be creative. Because she is Martha Stewart, the recipe actually calls for you to MAKE your own ice cream. I'm lazy so I bought Breyers Double Churn Peanut Butter Fudge Ice Cream. It worked okay, but even after sitting out for 15 minutes, the texture never was really spreadable. It went straight from a solid to a liquid, so I had to work quickly.

    TIPS
  • If you make the full recipe, make sure your cooling racks are as large as the pan you use. Otherwise your brownie will break, but this makes for a delicious ice cream topping.

  • If part of your brownie breaks after assembly while in the freezer, don't fret. The split topped brownie actually looked really beautiful with some ice cream peaking through.

  • INGREDIENTS

    Vegetable-oil cooking spray
    2 cups all-purpose flour
    1 1/2 teaspoons baking powder
    1 1/2 teaspoons salt
    11 ounces (2 sticks plus 6 tablespoons) unsalted butter, room temperature
    7 ounces unsweetened chocolate
    2 2/3 cups sugar
    4 large eggs
    2 teaspoons pure vanilla extract
    4 cups Peanut Butter Ice Cream

    DIRECTIONS
    1. Preheat oven to 350 degrees. Coat two 13- by-18-inch rimmed baking sheets with cooking spray, line with parchment, and spray parchment.

    2. Whisk flour, baking powder, and salt in a medium bowl. Melt butter and chocolate in a large heatproof bowl set over a pot of simmering water, stirring until smooth. Remove from heat, add sugar, and stir until dissolved. Stir in eggs, 1 at a time, and then stir in vanilla. Stir in flour mixture until just incorporated. (Do not overmix.)

    3. Divide batter between pans. Use an offset spatula to spread batter into thin, even layers. Bake, rotating pans once, until batter just begins to set, 8 to 10 minutes. (The surfaces will look dry, and testers inserted in the centers will come out wet.) Let cool completely in pans on wire racks.

    4. To assemble, place the flat side of a large wire rack over 1 brownie, and invert rack, brownie, and pan together. Remove pan and parchment. Repeat with remaining brownie. Place a clean rimmed baking sheet over 1 brownie, and invert pan, brownie, and rack together. Remove rack. The brownie should be in the pan, top side up.

    5. Spread ice cream in a smooth, even layer over brownie in pan. Align pan lengthwise with remaining brownie on rack, and use rack to quickly and carefully flip brownie onto ice cream. Remove rack. Press top brownie gently. Cover and freeze until firm, at least overnight (or up to 1 week).

    6. Uncover, and cut into squares. Serve immediately (or cover and freeze ice cream sandwiches overnight).
    Yeilds 3 dozen sandwiches.

    Monday, July 7, 2008

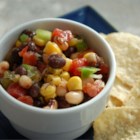
    Spicy Bean Salsa

    DON'T JUDGE ME. Sometimes, I crave something that looks complicated, but is incredibly simple. Sometimes that involves vegetables in a can and pre-made dressing. I've accepted my flaws, and enjoyed it without shame! It was delicious. So delicious, that I plan on making this on a regular basis either as a side, or as a salsa served with chips. I made a few changes to the recipe, which I'll post here, but you can click here to see the original recipe.

    INGREDIENTS

    1 (15 ounce) can chick peas
    1 (15 ounce) can black beans, rinsed and drained
    1 (15 ounce) can whole kernel corn, drained
    1/2 cup chopped red onion
    2 Roma tomatoes, diced
    1 cup Italian-style salad dressing
    1/2 teaspoon garlic salt

    DIRECTIONS
    1. In a medium bowl, combine chick peas, black beans, corn, red onion, and tomatoes. Season with Italian-style salad dressing and garlic salt; mix well. Cover, and refrigerate overnight to blend flavors.

    Wednesday, June 11, 2008

    Crock-Pot Pizza

    YAY! I'm back from vacation and it's only taken me 3 weeks and a lot of people beating me with wet noodles to update. We had a GREAT vacation and you can check out a few highlights here.

    On Sunday we had some friends over, but I didn't really feel like cooking. I decided to browse crock pot recipes on Taste of Home and found this. I'll be honest. I wasn't crazy about making it, but it was easy and didn't require a lot of prep. Everyone loved it however, except for me. I thought it was just okay. More of a "kids" meal, but hey, most the time I'm a big kid anyway! On a side note, I could NOT bring myself to use 6 CUPS of cheese in one recipe, so I only used 4 cups instead...still a lot of cheese and I could probably get away with using less.

    INGREDIENTS:
    1 package (16 ounces) wide egg noodles
    1-1/2 pounds ground beef or turkey
    1/4 cup chopped onion
    1 jar (26 ounces) spaghetti sauce
    1 jar (4-1/2 ounces) sliced mushrooms, drained
    1-1/2 teaspoons Italian seasoning
    1 package (3-1/2 ounces) sliced pepperoni, halved
    3 cups (12 ounces) shredded part-skim mozzarella cheese
    3 cups (12 ounces) shredded cheddar cheese

    DIRECTIONS:
    1. Cook noodles according to package directions. Meanwhile, in a large skillet, cook beef and onion over medium heat until meat is no longer pink; drain. Stir in the spaghetti sauce, mushrooms and Italian seasoning. Drain noodles.

    2. In a 5-qt. slow cooker coated with cooking spray, spread a third of the meat sauce. Cover with a third of the noodles and pepperoni. Sprinkle with a third of the cheese. Repeat layers twice. Cover and cook on low for 3-4 hours or until heated through and cheese is melted.
    Yield: 6-8 servings.

    Wednesday, April 30, 2008

    Spahgetti with Cherry Tomatoes, Chicken, and Parsley


    What do you do when you have leftovers, but no food in the house? Mix them all together of course! Looking at my pictures... I really want to learn to take better photos. I'll work on that.

    INGREDIENTS:
    1 left over fully cooked chicken breast
    3 cups left over spaghetti
    1 tablespoon olive oil
    Cherry tomatoes, cut in half
    Garlic salt to taste
    Publish Post
    Parsley

    DIRECTIONS
    1. Cut chicken breast in thin slices and saute until warmed through in a little cooking spray.
    2. Add olive oil, pasta, tomatoes, and garlic salt cook for 10 minutes or until everything is hot.
    3. Eat and pat yourself on the back for coming up with something so yummy so quickly.

    Wednesday, April 23, 2008

    That's a lot of Rum Cake


    To finish my Caribbean dinner, I made a rum cake with more rum and butter than any other cake in my life, but it was worth it. A few tips I can give you are, I didn't have a bunt cake pan, so I used a 10 or 12 inch spring form pan, and I would also suggest making it the day before so the flavors can mellow out a little unless you just reallllly love rum.

    INGREDIENTS

    Rum Cake
    1 1/2 cups butter, softened
    1 1/2 cups granulated sugar
    3 large eggs
    1 egg yolk
    2 teaspoons vanilla extract
    2 tablespoons grated lemon rind
    1/2 cup dark rum
    1/4 cup banana liqueur*
    3 cups all-purpose flour
    2 teaspoons baking powder
    1/2 teaspoon baking soda
    1/8 teaspoon salt
    1 cup whipping cream
    Rum Syrup
    Powdered Sugar

    Rum Syrup
    10 tablespoon butter
    3/4 cup sugar
    1/4 cup dark rum
    1/4 cup banana liqueur*

    DIRECTIONS

    Rum Cake

    1. Beat butter and granulated sugar at medium speed with an electric mixer until light and fluffy. Add eggs, egg yolk, and vanilla, beating until blended. Add lemon rind, beating until blended. Gradually add rum and banana liqueur, beating until blended. (Batter will look curdled.)

    2. Stir together flour and next 3 ingredients; add to batter alternately with whipping cream, beginning and ending with flour mixture. Beat batter at low speed just until blended after each addition. Pour batter into a greased and floured 10-inch Bundt pan.

    3. Bake at 350° for 55 to 60 minutes or until a long wooden pick inserted in center of cake comes out clean.

    4. Cool in pan on a wire rack 15 minutes. Pierce cake multiple times using a metal or wooden skewer. Pour Rum Syrup (recipe Below) evenly over cake. Let stand 45 minutes. Remove from pan; cool completely on a wire rack. Sprinkle evenly with powdered sugar before serving.
    *1/4 cup dark rum may be substituted for banana liqueur.

    Rum Syrup

    1. Melt butter in a 2-quart saucepan over medium-high heat; stir in remaining ingredients. Bring to a boil, stirring often; reduce heat to medium, and cook, stirring often, 8 to 10 minutes or until slightly thickened. Remove from heat, and cool 10 minutes.
    *1/4 cup dark rum may be substituted for banana liqueur.

    Tuesday, April 22, 2008

    Jen's Quick Coconut Rice


    When I made the spiced chicken, I made some coconut rice to go with it. I understand that in theory when you have very few ingredients in a recipe, you should use the best ingredients you can find. Then, there's life where you need dinner on the table in 30 minutes and there just isn't enough of you to make several time consuming recipes at once. I chose to use 5-minute rice, and it was delicious!

    INGREDIENTS

    2 Cups White 5-Minute Rice
    1 Cup Lite Coconut Milk (found in the Asian food aisle)
    1 Cup Water
    1 Tbsp sugar
    Salt - to taste

    DIRECTIONS
    1. In a sauce pan bring milk and water, sugar, and salt to a boil.

    2. Remove from heat and add rice.

    3. Let stand for 5 minutes and then fluff with a fork. I usually add it back to the cooling eye to cook off more of the liquid if there is some left over in the rice.

    Yeilds 4 servings.

    Monday, April 21, 2008

    Grilled Spiced Chicken with Citrus Mango Sauce


    This weekend I was in the mood to try all new recipes, and being that my best friend's husband lived in Jamaica for a while, I went with a Caribbean theme. There'll be three new recipes this week, but I'm starting with the main course. The recipe called for it to marinate for only 20-30 minutes, but I did it for 3 hours. I liked this, but it was interesting to get used to cinnamon on chicken. Next time, I think I'll leave that out, but everyone else really liked it.

    EDIT: I really could have used this video the other day! How to Cut a Mango.

    INGREDIENTS

    Chicken Rub
    1 teaspoon ground ginger
    1/2 teaspoon ground cinnamon
    1/4 teaspoon ground cumin
    1/4 teaspoon ground anise seed
    1 dash cayenne pepper
    4 skinless, boneless chicken breast halves

    Citrus Mango Sauce
    1 mango - peeled, seeded and diced
    1/2 cup orange juice
    2 tablespoons fresh lime juice
    2 tablespoons honey
    2 teaspoons cornstarch
    1 1/2 tablespoons water
    2 tablespoons dark rum

    DIRECTIONS

    1. In a medium bowl, mix the ginger, cinnamon, cumin, anise, and cayenne pepper. Rub the chicken with the spice mixture, and place in the bowl. Cover, and refrigerate 20 to 30 minutes.

    2. In a small saucepan, mix the mango, orange juice, lime juice, and honey. Bring to a boil, reduce heat, and simmer for 5 minutes, stirring occasionally. In a small cup, mix cornstarch with 1 1/2 tablespoons of water until cornstarch is dissolved. Stir into mango mixture, and simmer one minute, or until sauce has thickened slightly. Stir in dark rum.

    3. Preheat an outdoor grill for medium heat. When grill is hot, brush the grate with oil.

    4. Grill chicken 6 to 8 minutes per side, until no longer pink and juices run clear. Serve over the cooked rice, and top with the mango sauce.

    Thursday, April 10, 2008

    Tortas Ahogadas/Drowned Sandwiches

    I participated in a Recipe Exchange for the first time and the theme was "Regional". I sent off Granny's Quick Cobbler and received in exchange (ha, get it?) the recipe for Tortas Ahogadas. Let me just tell you, me and these sandwiches are cursed, but I am stubborn and would NOT give up. Being that this is a Tex-Mex recipe, I had some trouble finding the peppers. Of course, once I DID find them at a local Tienda de Mexicana, I got home only to find that I had bought TWO of the same types of peppers instead of the two different ones I thought I'd picked up. I will do this post a little differently than others and very much in the style of The Pioneer Woman Cooks.


    WHAT YOU'LL NEED

    3 Anaheim Chiles, dry…cleaned of seeds & membrane
    3 Pasilla Chiles, dry…cleaned
    1 Kilo (2-3 lb.) beef roast
    1 onion, coarsely chopped
    4-6 cloves of garlic
    Salt & Pepper, to taste
    Teaspoon of oregano
    10 sun-dried tomatoes
    1-3 canned chipotle chilies to taste

    Now see... in Tennessee, we don't really have access to a lot of peppers in our area. The ONLY place I had any luck was at the Mexican Market. Unfortunately, I ended up with 2 bags of Pasilla Chiles, which are actually sweet and not spicy by the way, so I added 5 Pasilla Chiles instead to make up for not having any Anaheims.

    You know what else is hard to find in Tennessee? Sun-dried tomatoes. I went to several stores looking for these as well, but settled for roasted red peppers instead. Oh, and don't even plan on finding Bolillo rolls. I went with a Keisar roll, but it really wasn't a great choice. The bread is too airy and becomes like mush with the gravy. So you, you try something different. Maybe a sub roll would work nicely.

    The night before I planed on making these, I put all of the above ingredients (minus the chipotles) in the crock pot and let it cook while I slept. Now THAT's my kind of cooking! The next morning I just put the removable pot in the fridge and heated it up on the stove when I got home from work for about 20-30 minutes.

    Now, let's get to the fun part! The pictures.


    You see this? DON'T DO THAT! I learned a very valuable lesson. Don't add too much hot liquid to your blender, and whatever you do, DO. NOT. USE. PULSE! The blend function on your blender is there for a reason. After that fiasco...yes... twice...I finally got smart.


    Do this instead! This is when you should add the chipotle peppers. I am a wimp, so I only added one chipotle, cleaned of seeds and membrane.


    MMMM....beef. ROAST beef. Start your assembly by pilling up as much beef as you think you can eat on one side of your bread.


    And that gravy you made in the blender that you DIDN'T get all over your house, car, cat, and that little spot on your back that's just out of reach, pour that all over the beef. Don't be shy. These aren't called drowned sandwiches for nothing!


    Now, you'll want to add some avocado. Go ahead, it's the good kind of fat. You can have all you want.


    Okay, something ELSE I couldn't find...okay I lied. What I really meant to say is I forgot to buy the crema. I hear it's a lot like sour cream, so I used that instead like the recipe suggested. Now drizzle that sauce over your avocado. Are you ready for the next step? Are you sure you can handle it?


    Put the lid on and eat. And eat. And eat. And then debate with yourself about making another one for you to eat. Go on... You don't have to watch what you eat everyday....

    These were delicious and definitely worth all the frustration of looking for ingredients. I consider it a scavenger hunt! Now, the OP said to not even attempt picking these up, but Dave is a rebel and ate with his hands. I'm too sophisticated for that, I really did need a fork and a knife...and then I might have licked my plate...just don't tell anyone!

    THE RECIPE
    "This recipe originally came from close family friends of ours who are from Mexico but it has become a family favorite for us too! My mom made it all the time growing up and now I have carried on the tradition. They are so delicious but don't be afraid of a little "kick"! I am from Texas and I think these represent the strong Tex-Mex culture that exists there. So many of my favorite foods are thanks to the Mexican influence so I thought this a fitting tribute!"


    Tortas Ahogadas (Drowned Sandwiches)

    3 Anaheim Chiles (dry…cleaned of seeds & membrane)
    3 Pasilla Chiles (dry…cleaned)
    1 Kilo (2-3 lb.) beef roast
    1 onion (coarsely chopped)
    4-6 cloves of garlic
    Salt & Pepper (to taste)
    Teaspoon of oregano
    10 sun-dried tomatoes (you can use dry or packed in oil…I use dry)

    2-3 canned chipotle chilies (depending on the amount of spice that you like) to add to broth, after meat has been stewed

    Cook the above ingredients in 2 liters of water until meat is tender (I use slow cooker on low for about 8 hours)…take out the meat and shred with two forks (so that the pieces aren't too big for the sandwiches)…cool for a while before proceeding with the next step so that you don't burn yourself…add the chipotle chilies to the broth (with meat still removed) and process either in small batches in food processor/blender…or use immersion blender. The mixture should be thick, like a gravy.

    Crema:
    ½ litre of Crema Fresca (or sour cream works too)
    3 Tablespoons of mayonnaise
    1 Teaspoon of mustard (roughly)
    Salt & Pepper to taste

    Other:
    Avocado (slices to go on sandwiches)
    Bolillo Rolls


    Assembly: Lay out a roll and place meat on one side. Then ladle some of the sauce over the top of the meat and top with avocado and Crema. These are fork & knife sandwiches…don't even think about trying to eat with your hands! Enjoy!

    Friday, March 21, 2008

    Strawberry Swirl Cake

    I found this recipe last year in my Kraft Foods Calendar (Why oh why have you forsaken me and quit making the only calendar I ever wanted to use again?! Curse you Kraft and your delicious recipes!) and it is UNbelievably good. I'm so happy it's finally spring, I may just make this for Easter. Or this.


    INGREDIENTS

    1 pkg. (2-layer size) white cake mix

    1 pkg. (4-serving size) JELL-O Brand Strawberry Flavor Gelatin
    2/3 cup BREAKSTONE'S or KNUDSEN Sour Cream
    2/3 cup powdered sugar
    1 tub (8 oz.) COOL WHIP Whipped Topping, thawed
    1-1/2 cups sliced strawberries

    DIRECTIONS

    1. Preheat oven to 350°F. Grease and flour two 8- or 9-inch round cake pans; set aside. Prepare cake batter as directed on package. Pour half of the batter into medium bowl. Add dry gelatin mix; stir until well blended. Spoon half of the white batter and half of the pink batter, side-by-side, into each prepared pan. Swirl batters together using a teaspoon.

    2. Bake 30 min. Cool 30 min. in pans. Remove to wire racks; cool completely.

    3. Mix sour cream and powdered sugar in medium bowl until well blended. Gently stir in whipped topping. Place one of the cake layers on serving plate; spread top with 1 cup of the whipped topping mixture. Top with 1 cup of the strawberries and remaining cake layer. Spread top and side of cake with remaining whipped topping mixture. Top with remaining 1/2 cup strawberries just before serving. Store any leftover cake in refrigerator.